Simulated Neural Network Robot
So you may be wondering what a Simulated Neural Network Robot is. To explain what it is first you need to understand how neurons work. So in addition to learning about electronics/code/robotics, you are going to learn some biology/neuroscience.
Neurons
Alright so the main components of neurons are the dendrites, the soma (cell body), the axon, and the terminal buttons. To show you what they look like I stole a photo off google image. Note, this image shows two neurons. The arrows show the direction information flows. You can see that the dendrites are the input, and terminal buttons are the output. If you want to think about what this does in terms of electronics, you can image the soma as a capacitor with a transistor at the end and the axon as a wire. The electricity won't flow down the axon unless it reaches a certain voltage. So (thinking about it as an electronic device) the dendrites receive pulses of electricity that charge the capacitor, once it reaches a certain voltage the transistor sends electricity down the axon and a pulse of electricity goes to the next neuron.
Please note the electronics analogy above isn't what neurons actually do, it is an analogy.

If you are satisfied with the electronics analogy, skip the next few paragraphs I will let you know where to read with some bold text. If you want to know what neurons do, read it.
Neurons have what is called a sodium potassium pumps embedded in their cell membrane. As you might imagine, it pumps sodium and potassium. More precisely it pumps three sodium ions out of the cell and two potassium ions in. Both have a positive charge, but more will end up outside the cell membrane. Some of the potassium ions will diffuse out to the lower concentration outside the cell membrane through a leaky gate, however the positive charge will keep some from diffusing out. Other ions and anions are also involved too, but we won't get into that. If you are interested in more details on the other players there are some good youtube videos that animate the process. So now there is a ion gradient across the neurons membrane, it will have a positive voltage outside the membrane and a negative charge inside the membrane.
When a neurotransmitter bonds to a receptor site on the dendrites it opens up an ion channel, it either does this directly (ionatropic), or indirectly (metabotropic) with a G protein/enzyme. For this purpose just know that a neurotransmitter opens an ion channel (gate/pathway). These channels are specific to certain molecules and the neurotransmitter is specific to a type of receptor. Depending on which type of ion channels the neurotransmitter opens, it can be excitatory or inhibitory.
So as an example, Glutamate is a neurotransmitter. The neuroreceptor specific to glutamate causes an ion gate specific to sodium to open. The the high concentration of sodium and voltage difference outside the cell membrane causes sodium to rush into the cell once the gate is open. The sodium rushing into the cell changes the voltage across the cell membrane. If the change in voltage is significant enough other ion gates near it (controlled by voltage) will open. This will continue down the axon until it reaches the terminal button. Here through a series of processes vacuoles filled with neurotransmitters bind to the cell membrane then release their contents into the synapse (gap between terminal button and another neuron's dendrites). You might be wondering what makes this process stop, why doesn't the voltage change just keep all the ion channels open. Well they only open briefly, after that they are in a refractory state where they won't open. This limits the firing rate of neurons and it prevents the propagation of the signal from going in reverse.
As an example of how a neurotransmitter can be inhibitory we will talk about GABA. When GABA binds to a neuroreceptor specific to it, it opens up chloride ion channels. Chloride is an anion, meaning that it is negatively charged. When the chloride channels open, chloride enters the neuron contributing to the negative charge that was created by the sodium potassium pumps. By contributing to the negative charge inside the neuron, it makes it more difficult to reach a significant enough voltage to cause the voltage dependent ion channels to open, thus the signal can't propagate down the axon.
Start here if you skipped the neuron mumbo jumbo
So in short:
1. A voltage difference maintained across the cell membrane with a sodium potassium pump.
2. Neurotransmitters change this voltage either up or down by opening ion gates.
3. The message propagates down the neuron.
4. Neurotransmitters are released to other neurons.
Code:
For complete code and documentation please check out my github
Alright so this isn't too hard to over simplify with code. Make a neuron object, give it some properties, write some functions.
First we well make a variable for the voltage in the neuron object. Then a variable for excitatory gates and a variable for inhibitory gates. Finally a Boolean variable for for whether or not it has fired.
So make a setup function to set your pins, then initialize the neuron data by setting the neurons to their resting potential.
Alright, so all of the neurons have to work at the same time. So we are just going to do each step for each neuron one at a time.
In my code it looks like this:
void loop()
{
  //gather sensory information
  ping();
  //connections betweeen neurons
  synapses();
  //calculate the state of each neuron
  for (int i=0;i<(number_of_neurons);i++)
  {
    neuron(i);
  }
  //fire all active neurons
  fire();
}
So first ping, we get all of the data from proximity sensors.
Then open excitatory or inhibitory gates based on the proximity sensor's values by changing the value of the variable representing the gates.
Then check to see which neurons fired previously by reading the fire variable and open excitatory or inhibitory gates based on which neurons previously fired.
Set a new concentration for each neuron based on the number and types of gates open. Run a function that represents the sodium potassium pump by changing the concentration again. Return all the gates values to 0.
Next check to see if the new concentration/voltage meets the threshold, if so set the fire variable to true.
Finally check to see which neurons fired. Depending on which neurons fired set wheel direction, or add or subtract to a variable representing wheel speed (use that speed as pwm). The neurons that fired will need to return to their resting concentration leave the values of other neuron's concentrations alone that way you can use the rate of fire to control them, much like pwm charging a capacitor slowly. Set fire to false for all neurons and let it loop back to the beginning.
So after doing that you have to make the connections between neurons meaningful. It is much more difficult than you think to form the connections to make something behave the way you want. First you have to design the circuit, then tinker around with the values you give to the number of gates that open.
To see what this circuit looks like I made a few charts.
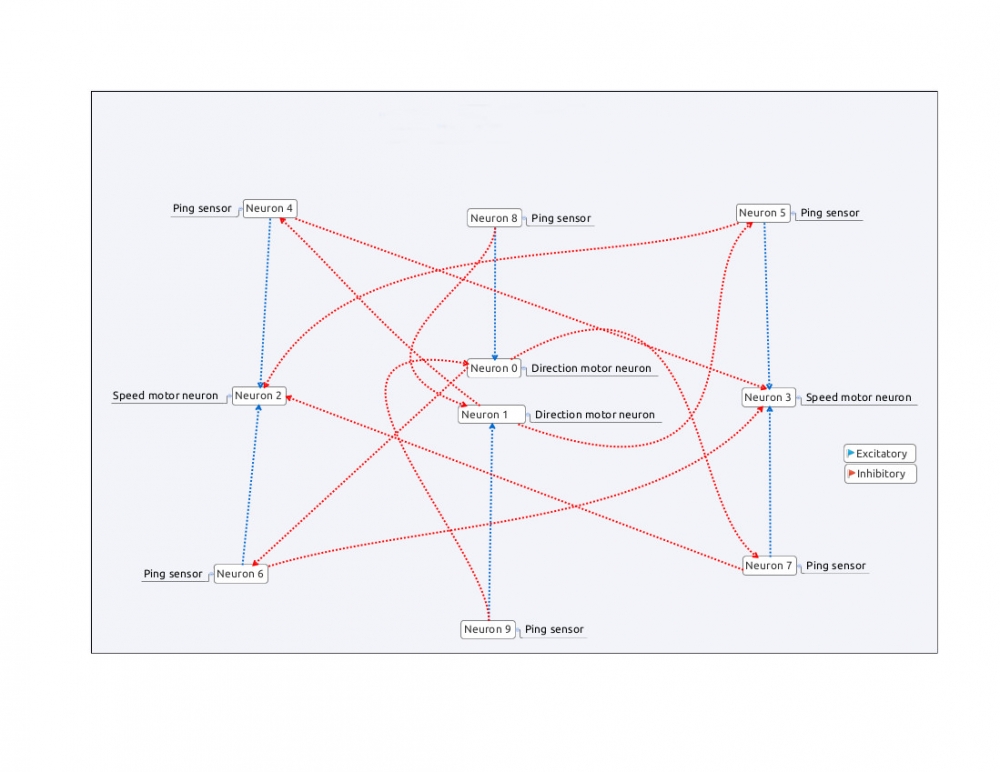
This complete chart can be a bit difficult to understand so I broke it up into smaller charts for each function.
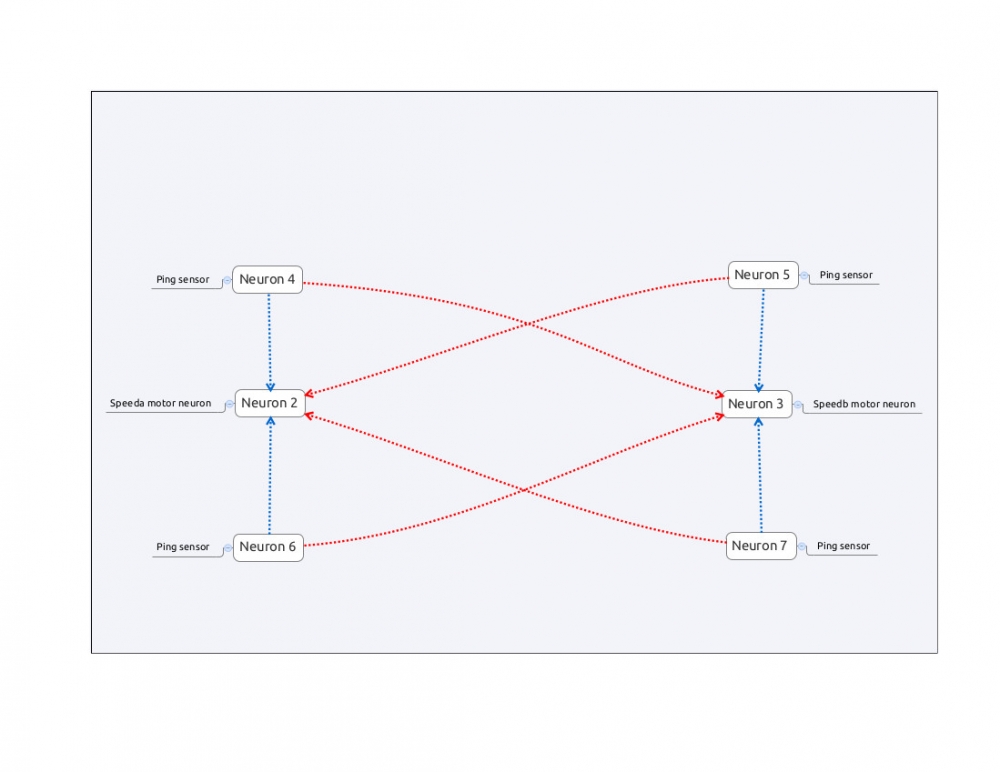
This chart controls the speed of each wheel. By speeding up on the same side as when an object is close and slowing down on the opposite side, it will turn away from the obstacle.
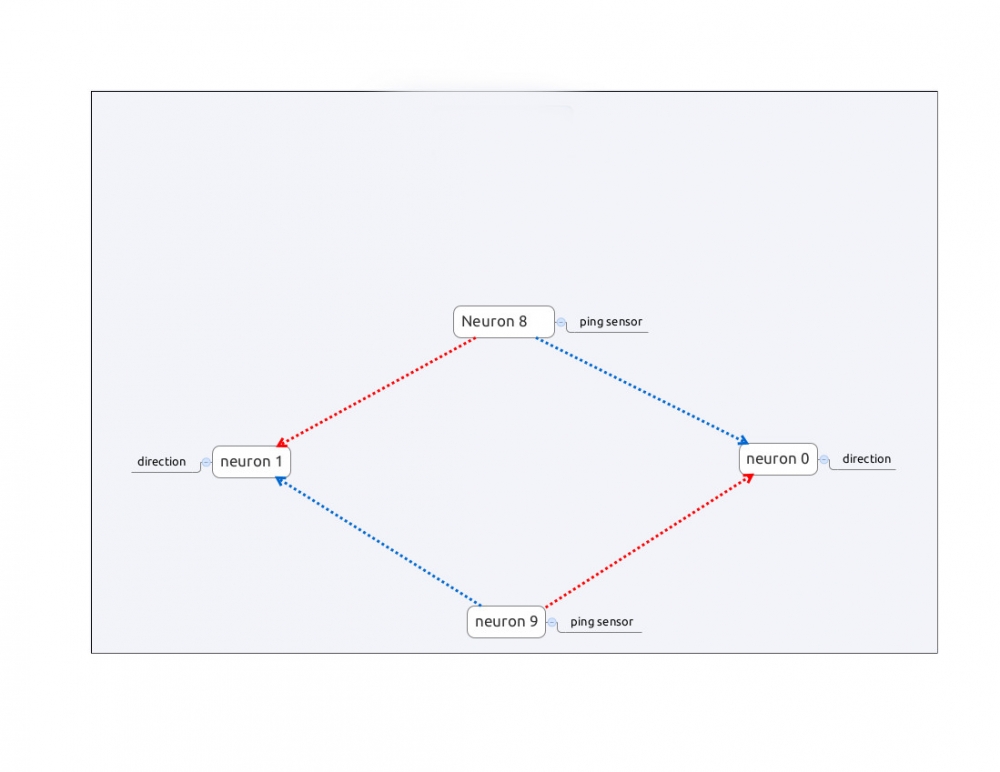
Direction is just like a latch circuit, it stays in its current correction until the opposite sensor senses it is too close to something.
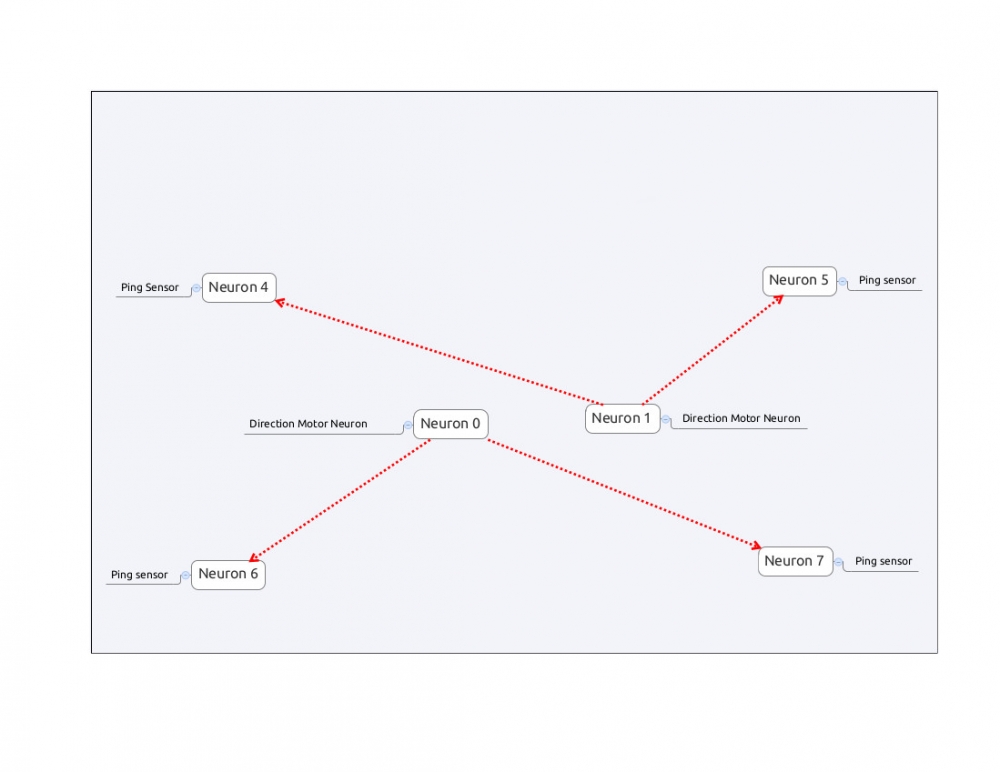
To prevent objects behind the robot (relative to its current direction) this circuit inhibits the rear proximity sensors from altering the speed.
The final product, a robot that explores.
If you want to see how the robot was made check out my previous post on How To Make a Simple Robot.
